이번에는 ROS2 humble에서 Intel D435 Depth Camera에 YOLOv8 을 붙여보도록 하겠습니다.
이번 글의 최종 목표는 rviz에서 YOLOv8으로 분석된 Image 화면을 확인하고
결과를 publishing 하는 것입니다.
실력이 부족해서 그런지
기능 하나하나를 쌓아가는게 너무 벅찬 것 같습니다.
그래도 이번에는, 이미 존재하는 매우 좋은 Github repository가 있어 이를 이용했습니다.
GitHub - mgonzs13/yolov8_ros: Ultralytics YOLOv8 for ROS 2
Ultralytics YOLOv8 for ROS 2. Contribute to mgonzs13/yolov8_ros development by creating an account on GitHub.
github.com
가장 헤맸던건 환경 설정들인데,
일단 먼저 이 github repo를 현재 패키지 위에 쌓겠습니다.
ros2에 yolov8 가 돌아갈 수 있게 가상 환경을 가장 먼저 해제해주겠습니다.
만약 가상환경이 아닌데도 여러 라이브러리를 설치하다가 conda 환경과 충돌이 발생하면
reboot를 해보시기 바랍니다.
conda deactivate

# 설치하실 workspace 로 수정하시기 바랍니다.

export COLCON_WS=~/workspace/ros_ur_driver

cd $COLCON_WS

cd src

# 여기서부터는 동일

git clone https://github.com/mgonzs13/yolov8_ros.git

pip3 install -r yolov8_ros/requirements.txt

pip install lap

pip install empy==3.3.4

pip install lark

cd ..

rosdep install --from-paths src --ignore-src -r -y

colcon build --symlink-install
colcon build --symlink-install
이거 좀 중요합니다.
그냥 colcon build를 하니 자꾸 라이브러리가 없다는 문제가 발생했습니다.
한참 헤멨습니다…
만약 위 명령으로 빌드 에러가 발생하면
기존에 존재하는 build, install, log 디렉토리를 삭제하고 빌드하시기 바랍니다.
빌드가 완료되면 먼저 ros2 intel realsense 카메라 노드를 활성화해주겠습니다.
터미널 하나를 추가로 새로 엽니다.
# workspace open

export COLCON_WS=~/workspace/ros_ur_driver

cd $COLCON_WS

# 동일

source install/setup.bash

ros2 launch realsense2_camera rs_launch.py depth_module.profile:=1280x720x30 pointcloud.enable:=true
이제 원래 터미널에서 YOLOv8을 활성화 시키겠습니다.
source install/setup.bash

ros2 launch yolov8_bringup yolov8.launch.py input_image_topic:=/camera/camera/color/image_raw target_frame:=camera_link device:=cpu
이 때, 경로와 카메라 link 이름은 수정하셔야합니다.
저와 intel realsense 부터 동일한 과정을 따라오셨다면 그대로 입력하셔도 됩니다.
이미지 토픽은 카메라 노드가 활성화 된 상태에서
ros2 topic list 명령어로 확인할 수 있습니다.
target_frame 이름은 ros2 run tf2_tools view_frames 결과로 생성되는
pdf 파일을 확인하시는 것을 추천드립니다.
일단 opencv를 cmake 빌드한 상태가 아니기 때문에, cpu로 돌립니다.
또 이것 때문에 한참 헤맸습니다..
결과 확인을 위해 세번째 터미널에서 rviz를 실행시킵니다.
저는 UR에 카메라가 달려있어 UR에서 rviz를 실행시켰습니다.
# workspace open and launch rviz2

export COLCON_WS=~/workspace/ros_ur_driver

cd $COLCON_WS

source install/setup.bash

ros2 launch ur_robot_driver ur_control.launch.py ur_type:=ur3e robot_ip:=192.168.1.101 launch_rviz:=true
이제 rviz에서 topic을 추가해주겠습니다.
Add 를 선택하고 /yolo/dbg_image/image 를 선택합니다.
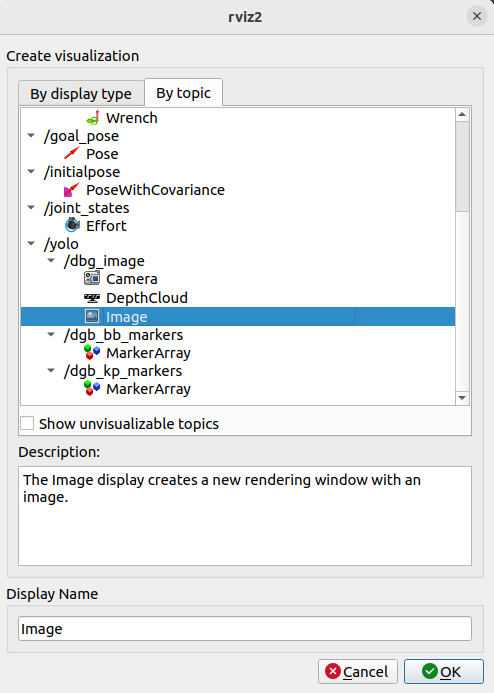
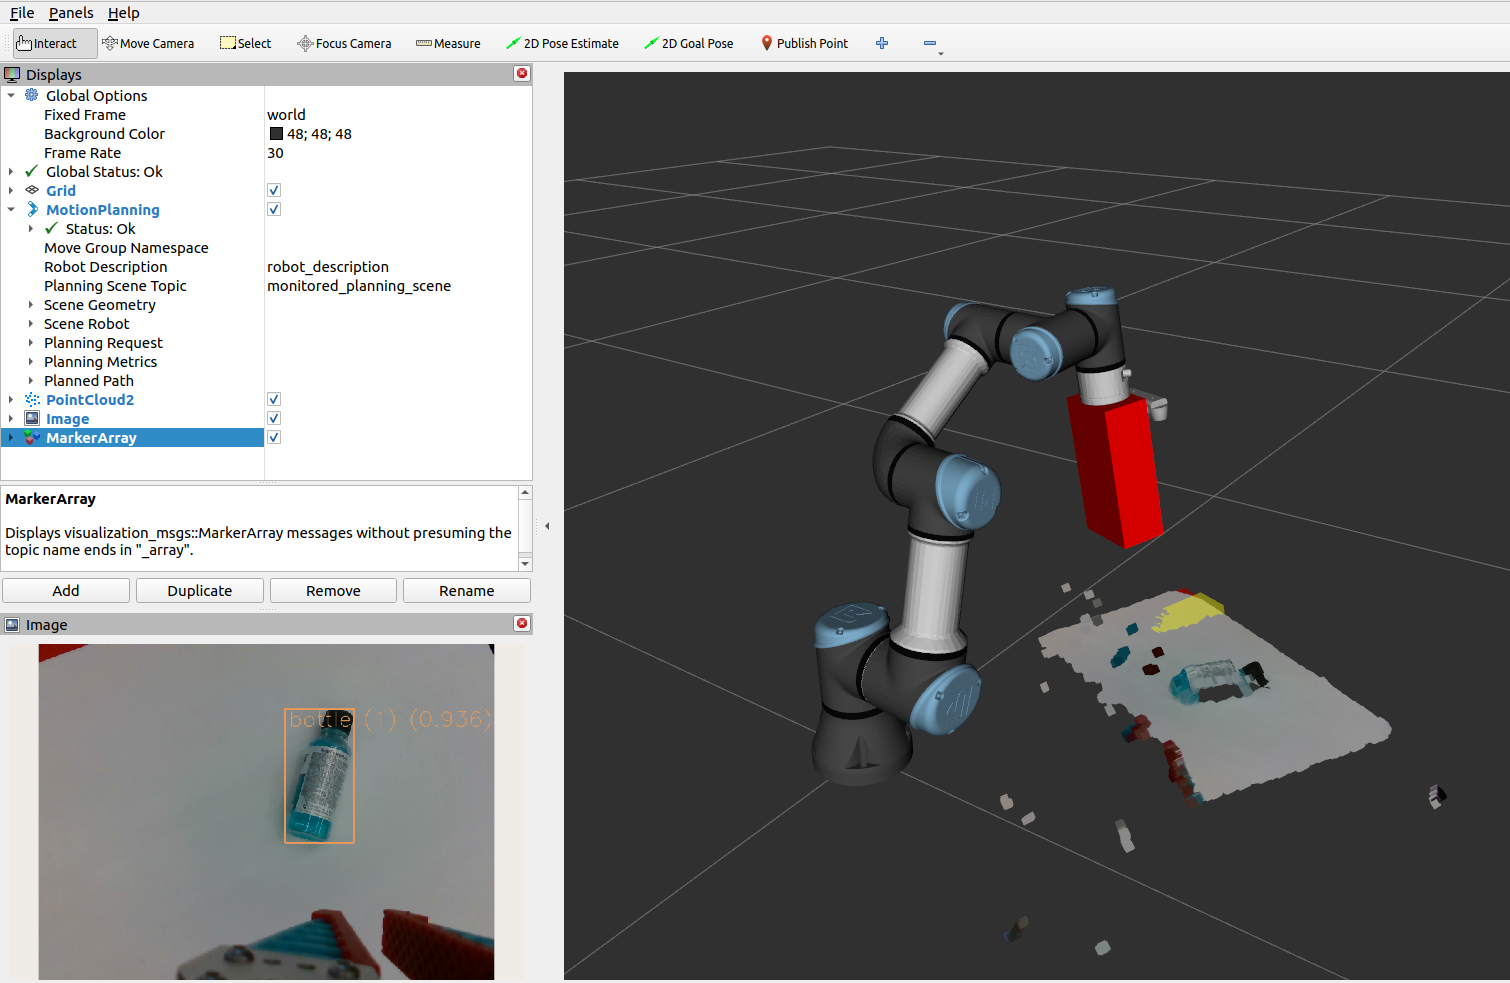
그럼 다음과 같이 분석된 화면이 나타납니다.
ID 기반 분석인 SORT 가 가능한 Tracking 기능으로 분석을 합니다.

ros2 launch yolov8_bringup yolov8.launch.py input_image_topic:=/camera/camera/color/image_raw target_frame:=camera_link device:=cpu model:=yolov8n-seg.pt
위 명령으로 수행하면, segment도 가능합니다.
gpu cuda를 사용하기 위해 opencv cmake가 필요하다고 생각해서,
ros2 환경에 맞게 새로 빌드했는데요,
결론적으론 GPU로 작동이 실패했습니다.
코드를 대충 조금 읽어본 결과 GPU 옵션을 받는 것은 있어도
이를 이용해서 돌리는 부분을 찾지 못했습니다.
아직 이 부분을 구현을 안했나 하는 생각이 듭니다…
아닐수도 있습니다.
어쨌든 이 부분은 나중에 보완하기로 하고..
이제 Depth channel을 이용하여 분석을 해야합니다.
다음 명령을 실행하여 depth 기반 분석을 수행합니다.
ros2 launch yolov8_bringup yolov8_3d.launch.py input_image_topic:=/camera/camera/color/image_raw input_depth_topic:=/camera/camera/depth/image_rect_raw input_depth_info_topic:=/camera/camera/depth/camera_info target_frame:=camera_link device:=cpu model:=yolov8m.pt
depth는 별 차이는 없지만, 실제 map에 depth 정보가 mapping됩니다.

다만 가끔씩 이상한 점은 새로운 모델을 불러와서 한 5초 정도 뒤부터 분석이 멈춘다는 점과
depth 기반 mapping이 이상한 점입니다.
아마도 calibration의 차이가 아닐까 예상합니다..
그리고 분석이 멈추는 것은 realsense 노드의 문제였던 것 같습니다.
카메라 노드를 다시 실행시켜주면 해결되었습니다.
일단은.. 이를 이용하여 물체까지의 depth와
카메라 상 pixel의 위치를 publishing 하는게 목표입니다.
일단은 다 제쳐두고 간단하게 center point의 depth를 추출해보고자 합니다.
먼저, yolov8_msgs 패키지 내에 msg 디렉토리에서 새로운 메시지 파일을 생성합니다.
DetectionInfo.msg라는 이름으로 만들어주었습니다.
DetectionInfo.msg 파일 내에 필요한 필드를 다음과 같이 정의하고 저장합니다.
int32 center_x
int32 center_y
float64 average_depth
int32 id
이후, yolov8_msgs 패키지의 CMakeLists.txt 에 해당 msg 파일을 추가합니다.
"msg/DetectionInfo.msg”

그리고 yolov8_ros 패키지의 yolov8_ros 디렉토리 내 detect_3d_node.py
헤더에 아래 코드를 추가하고,
from yolov8_msgs.msg import DetectionInfo
#pubs 아래에 아래 코드를 추가합니다.
10은 적절하게 조절하여, 버퍼를 얼마나 유지할지를 결정할 수 있습니다.
realtime이 필요하다면 buffer를 줄이고,
안정성이 필요하다면 buffer를 늘이는게 좋습니다.
self.info_pub = self.create_publisher(DetectionInfo, 'detection_info', 10)
convert_bb_to_3d 함수 내부에서 detection_info 값을 처리하도록 만들었습니다.
저는 bottle 만을 감지하길 원했기 때문에 아래와 같이
bottle의 id에 해당하는 39 값만 퍼플리싱하도록 설정했습니다.
if detection.class_id == 39:
    info_msg = DetectionInfo()
    info_msg.center_x = center_x
    info_msg.center_y = center_y
    # average_depth 계산 필요
    info_msg.average_depth = float(depth_image[center_x][center_y]/1000)
    info_msg.id = detection.class_id
    self.info_pub.publish(info_msg)

그리고 이제 빌드를 수행합니다.
colcon build

source install/setup.bash
이제 정상적으로 topic이 발행되는지 확인하겠습니다.
이 글의 상단부에 있는 명령들을 참조하셔서 첫번째 터미널에서 realsense 카메라를 활성시키고
두 번째 터미널에서 yolo를 다음 명령으로 활성화 시킵니다.
ros2 launch yolov8_bringup yolov8_3d.launch.py input_image_topic:=/camera/camera/color/image_raw input_depth_topic:=/camera/camera/depth/image_rect_raw input_depth_info_topic:=/camera/camera/depth/camera_info target_frame:=camera_link device:=cpu model:=[yolov8m.p](http://yolov8m.pt/)t
세 번째 터미널에서 rviz를 실행시키고, 여러 topic 을 Add 합니다.
3d box가 이상한 곳에 쳐집니다.
위에 말했듯, calibration 문제라고 생각합니다.
저는 중요한건 그게 아니고 topic을 받아올수만 있으면 됩니다.
새 터미널에서 다음 명령을 입력합니다.
ros2 topic echo /yolo/detection_info
다음과 같이 정보가 나타나며, 병을 움직임에 따라 값이 변화합니다.
이 때는 제가 코드를 수정을 안해서 mm단위로 depth가 나타나는 상태입니다.

만약 아무것도 안나타나면 과정에 문제가 있거나 토픽이 발행되지 않았거나..
여러 문제가 있을 수 있습니다.
ros2 topic list 명령어로 확인하시기 바랍니다.
그럼 이제 topic이 발행되었으니
다음 글에서는 이를 이용해 camera transformation matrix를 계산하고
real world 좌표로 변환하는 과정과,
해당 위치로 로봇의 그리퍼 위치를 옮기는 작업으로 넘어가겠습니다.
'Setup & Example > ROS2 + 예제' 카테고리의 다른 글
| ROS2 기반 Isaac ROS CenterPose Example 수행하기 (0) | 2024.02.20 |
|---|---|
| ROS2 에서 Vision 기반 UR3e Pick and Place 수행하기 (1) | 2024.02.16 |
| ROS2 MoveIt2 이용하여 UR3e 의 Link Position 및 Quaternion 획득하기 (2) | 2024.01.31 |
| ROS2 MoveIt2 에서 UR3e + Intel RealSense Pick and Place 예제 수행 (3) | 2024.01.27 |
| ROS2 UR3e + Intel RealSense 임시 결합 하기 (1) | 2024.01.24 |